Saturday, June 29, 2013

Vanilla Bean Custard over Fresh Fruit Bowls

When the weather gets HOT, I crave fresh fruit.  Especially pineapple and strawberries.  I usually eat my fruit with vanilla yogurt, but this time, I wanted to spice things up a bit.  A vanilla bean custard was calling my name.

It turned out even better than I hoped and it tastes DIVINE.  It is rich and creamy and absolutely addicting drizzled over fruit.  I think it has just the right amount of sugar to make it sweet, but not too much that it is overwhelming when eaten with sweet fruit.  I made a fruit bowl with some apples, kiwis, strawberries, nectarines, mangoes and pineapple and it was a perfect Saturday afternoon snack.  
I can imagine this custard sauce would also be amazing on other desserts like a warm brownie with ice cream.  Or drizzled over strawberry shortcake or a banana walnut blondie.  mmm . . . I'm getting ideas here.    

This is a perfect light and refreshing snack after a long day at the Pool or Zoo or Park or whatever.
This is the vanilla bean paste that I love.  It is sweeter than other brands I have tried and it has a really good vanilla flavor.  
Vanilla Bean Custard
From: Jenn@eatcakefordinner
(Printable Recipe) or (Printable with Picture)

2 c. milk
1/2 c. sugar
2 tsp. cornstarch
pinch of salt
1 Tbl. vanilla bean paste
4 egg yolks

Whisk together the sugar, cornstarch and salt; add to a medium saucepan.  Slowly whisk in the milk and heat over medium heat.  Stir in the vanilla bean paste.  Once mixture is warm and begins to steam, beat egg yolks in a small bowl.  Slowly drizzle 1/2 cup of warmed milk mixture into the beaten egg yolks, whisking constantly.  Then, add egg mixture to remaining milk in the pan, while whisking constantly.    

Continue cooking over medium heat until mixture thickens, about 10-15 minutes, stirring occasionally.  When it's done, mixture will coat the back of a wooden spoon and if you run the back of another spoon down it, the line will remain and won't run back together.  Remove from heat.  Pour mixture into a medium bowl and place a piece of plastic wrap directly on the surface.  Refrigerate until completely cool.  Serve with fresh fruit or drizzle over a warm brownie topped with ice cream.  Keep refrigerated and eat within four days.   

Jenn's Notes: If you want to enhance the vanilla flavor even more, add 1 teaspoon of vanilla extract. 

Thursday, June 27, 2013

Roasted Red Pepper Macaroni Salad

Remember when I told you the only macaroni salad I like is my Mom's?  Well, I am trying to be more adventurous with my side dishes and macaroni salads are perfect for Summer.

My mom makes her salad with Miracle Whip, which I love, because I love that tang, but "The Mr." wanted to try Mayo with ours.  I know everyone is pretty particular with which one they use, so feel free to switch it up according to your taste.

The Sriracha might seem like an odd-ball ingredient, but I felt like it was missing something and the Sriracha gave us that missing flavor.  It does not make it spicy.  

Serve alongside:
My go-to Sloppy Joes
Smokey Mesquite BBQ Bacon Burgers
Cajun Sliders
Easy BBQ Pulled Pork Sandwiches
Buffalo Chicken Sandwiches
Roasted Red Pepper Macaroni Salad
From: Jenn@eatcakefordinner
(Printable Recipe) or (Printable with Picture)

1 1/2 c. elbow noodles (measure before it is cooked)
2 hard boiled eggs, chopped
1/2 c. celery, diced
1/4 c. green bell pepper, finely chopped
2 Tbl. green onions, chopped
1/4 c. jarred roasted red peppers, 
   patted dry and chopped
3/4 c. Mayonnaise (or Miracle Whip)
1 tsp. Sriracha hot sauce
1/2 Tbl. prepared yellow mustard
1 tsp. lemon pepper
1 tsp. garlic powder
salt and pepper, to taste

Cook noodles according to package directions; drain and rinse well.  Rinsing the noodles will prevent them from sticking together.  Set aside to cool and dry completely.  Meanwhile, stir together the Mayonnaise, Sriracha hot sauce, yellow mustard, lemon pepper, garlic powder, salt and pepper; set aside.  When noodles are cool and dry, add the chopped eggs, celery, green pepper, green onions and roasted red peppers.  Add the sauce mixture and fold together until everything is coated in sauce.  Taste and adjust seasonings, as needed.  Keep refrigerated until ready to serve.  Serves: 4-6

Jenn's Notes: If you like a super creamy macaroni salad, add more Mayo or Miracle Whip.  

Wednesday, June 26, 2013

Watkins Vanilla WINNER Announced


Thanks to everyone who entered this giveaway for one of my favorite products and thank you to Melissa for sponsoring it!  I wish I could give each and every one of you a bottle of this vanilla, but since I can't, the good news is . .  . you can order a bottle through Melissa following the instructions down below.

Just try it once and you will be sold for a lifetime! 


The winner of one 11 oz. bottle of Watkins Double Strength Vanilla is . . .
. . . Pammie
who said "LOVE your site and follow you by email and facebook"

Winner must respond within 72 hours or a new winner will be selected.

Monday, June 24, 2013

My Go-To Sloppy Joes

First things first, Google Reader will be gone on July 1st.  So, make sure and get all your blogs transferred over before that.  You don't want to miss a post!  I used bloglovin' to transfer mine and it couldn't have been easier.  

If you would rather, you can always follow me via email, FacebookPinterest or Google +.

Now, this is a recipe I have posted before (my 2nd recipe ever on this blog), but fast-forward several years with an updated photo and a few tweaks to the recipe, I figured it needed to be re-shared.  

I have been making this recipe for the past three years.  It can be made in less than 30 minutes.  

We tried it, loved it and it has been my go-to recipe ever since.  I am not a fan of that "canned stuff", so I was glad to finally find a recipe from scratch that is both delicious and easy to throw together.  If you have never tried pickles on your sloppy joes, you should, it's really good.  

My Go-To Sloppy Joes

1 Lb. ground beef
1/2 c. onion, finely chopped
1 green bell pepper, finely chopped
2 cloves garlic, minced
3/4 c. ketchup
1 1/2 Tbl. brown sugar
1 1/2 tsp. chili powder
3/4 tsp. dry mustard
a few dashes of Worcestershire
2 Tbl. tomato paste
salt & pepper, to taste
1/2 c. water, only if needed
hamburger buns, toasted
Mayo or Miracle Whip
sliced pickles, opt.
sliced Cheddar cheese, opt.

Brown ground beef in a large skillet.  When meat is almost cooked through, add the onion, green pepper and garlic and cook a few minutes.  Add ketchup, brown sugar, chili powder, dry mustard Worcestershire, tomato paste, salt and pepper  Stir to combine.  If mixture is too thick, add some water.  Simmer for 5 minutes.  Spread Mayo or Miracle Whip over toasted hamburger buns top with sloppy joe mix, sliced pickles and sliced cheese.  Yield: 4-6 sloppy joes.    

slightly adapted from: Pioneer Woman

Friday, June 21, 2013

Peanut Butter Comfort Cookbook Review Plus Chocolate Peanut Butter Donuts with Vanilla Peanut Butter Glaze

Oh Averie Sunshine . . .  where do I even begin?

She wrote an entire book dedicated to peanut butter.  

I have been following Averie's blog, Averie Cooks, for just a little while and I am drawn to every single post and I actually read every word she types.  She has a remarkable talent at describing food in so much detail that it basically has you tasting the food without actually tasting it.   You know what I mean?  There is only one other food blogger I know that describes food like that.  

Not to mention, she takes beautiful photographs.  Never have I seen a super shiny melted chocolate chip look as mouthwatering as it does in her pics.  Her food looks "real" and it really makes me want to eat it.
This book is so well put together.  

Here are some of the reasons why I love it:
  1. Every single recipe includes a picture.
  2. Every single recipe includes a perfect description of the treat.
  3. The majority of ingredients are things I always have in my pantry and fridge.
  4. The instructions are easy to follow.
  5. The recipes make smaller batches (which is absolutely perfect for "The Mr." and me), but you can also double the recipes, if needed for larger groups.
  6. She explains the science behind things.  Like using baking powder vs. baking soda.
  7. You can open the book and it stays open and flat.
  8. I love the size of the book, it is not big and bulky at all.  The only downside is the font is a little small for my eyes.  If I am holding the book normally, I can read it just fine, but when I set it down on the counter to make a treat, I have to put on my glasses to see the words.
Every recipe includes peanut butter.  Some showcase it as the main flavor, while others include it as more of a binding agent.

Did I mention this book is AMAZING.  I started at the beginning searching for a recipe to post in this review.  I found so many I can not wait to try.  Each one, I said "oh, this is the one I am making first", then I would turn the page and say "no, this is the one I am making first".
Here are some of those yummy recipes:
No Rolling Buttered Up Biscuits
Peanut Butter Cupcakes
Peanut Butter Cup Peanut Butter Banana Bread
Marshmallow Butterscotch Fluffernutter Bars
Banana Bread Pudding Cake
Peanut Butter Swirl Chocolate Chip Blondies
Peanut Butter Cocoa Krispies S'mores Bars
Butterscotch Cream Peanut Butter Cookies

See how hard it was to pick one?

I finally narrowed it down to the Chocolate Peanut Butter Donuts with Vanilla Peanut Butter Glaze.  Um, yum!
They turned out good.  This was my first attempt at donuts since I picked up my donut pan.  As long as you have a glass of milk nearby, I think you will enjoy them.  I actually liked them better the 2nd day.

The donut is dense and moist and the peanut butter glaze is pretty much the best thing and you better bet I licked that bowl clean :)

Overall, I really like this book and I know any peanut butter lover will too.
Chocolate Peanut Butter Donuts
3/4 c. all-purpose flour
1/4 c. unsweetened cocoa powder
1/3 c. sugar
1 tsp. baking powder
1/4 tsp. cinnamon, opt.
2 Tbl. unsalted butter
2 Tbl. creamy peanut butter
1/2 c. buttermilk
1 large egg
1/2 tsp. vanilla extract

Vanilla Peanut Butter Glaze
1 Tbl. unsalted butter
2 Tbl. creamy peanut butter
1/3 c. powdered sugar, sifted
1/2 tsp. vanilla extract
2 tsp. cream, milk or buttermilk

Preheat oven to 325 degrees.  Grease a donut pan with non-stick cooking spray; set aside.  In a large mixing bowl, sift together the flour and cocoa.  Add the sugar, baking powder and cinnamon.  In a small bowl, combine the butter and peanut butter; microwave for 30 seconds or until melted.  Stir together until smooth.  In a third bowl, whisk together the buttermilk, egg and vanilla.  Whisk the melted peanut butter mixture into the buttermilk mixture.  Add wet ingredients to dry ingredients and stir together just until combined.  Do not overmix or donuts will be tough.  Using a spoon, fill each donut cavity 2/3 full with batter.  If any batter gets on the middle of the donut cavity, wipe away with a paper towel.  

Bake for 9-11 minutes or until top springs back when lightly touched.  Remove from oven and cool in pan for 10 minutes.  Remove from pan and cool.  While donuts are cooling, make the glaze.  

For the Vanilla Peanut Butter Glaze: combine butter and peanut butter and microwave for 30 seconds or until melted. Stir until smooth.  Add the powdered sugar and vanilla and stir together.  Gradually add in milk, as much as needed, to reach a glaze consistency.  Dip the the top of each donut into the glaze.  Yield: 6 donuts.

Jenn's Notes: I thought these were great, but next time I will omit the cinnamon.  My donut pan must have been smaller than hers, because I got 8 donuts.  They were perfect at 9 minutes.  I also made a little extra glaze, so I would have enough for 8 donuts rather than 6.  

The publisher provided me with a copy of this cookbook for the purpose of this review, but all opinions expressed herein are my own.

Tuesday, June 18, 2013

Watkins Vanilla GIVEAWAY aka The BEST Vanilla known to Mankind

Giveaway has ended.  Click HERE to see the winner.
I have the BEST EVER Giveaway for you guys today.

It is sponsored by Independent Watkins Consultant - Melissa #403264.  She is offering one of Eat Cake For Dinner's readers an 11 oz. bottle of Watkins Double Strength Vanilla.  That is a BIG bottle of vanilla and you will use every last drop of it. 

Watkins Vanilla is the BEST vanilla I have ever used in my entire life and I have tried A LOT of vanilla.  Check out my vanilla stash.  There really is a difference in good vanilla.  
Once you go Watkins, you never go back :)

I promise, it is worth every single dollar spent.  Ounce for ounce this stuff is a great deal.  

I know what you are thinking . . . WOW, this girl is really passionate about her Vanilla.  The truth is, I really am.  I tried for years to figure out how to make the perfect frosting.
Now, I get asked all of the time, why does your frosting taste so good?  Mine never tastes like that.
Well, my friends, I am letting you all in on my SECRET INGREDIENT . . . WATKINS Double Strength Vanilla.

This vanilla is made with Madagascar Bourbon vanilla beans and is low in alcohol, so it is all Vanilla flavor.  It makes the best frosting, homemade whipped cream, ice cream, divinity, cookies and everything else you can think of.  The first time I tried homemade whipped cream with Watkins Vanilla, it was game over.  BEST THING EVER.

It also makes the best present for Birthdays, Christmas, Mother's Day, Father's Day, Wedding, House-Warming and so on.

Even my Grandma used to use Watkins Vanilla.  Check out this vintage bottle I found in her fruit room.   A glass bottle with a cork top - I love it.  It still smells like yummy vanilla too. 
Watkins also sells many other amazing items like flavored extracts, spices, lotions, home products,
etc . . .  My friend just got the Lemon Cream Lotion and it smells so good.

Please go order some Watkins products through Melissa.  I know you will be so pleased and will become a lifetime purchaser of these products.
www.jrwatkins.com


To ENTER this Giveaway for one 11 oz. bottle of Watkins Double Strength Vanilla:
1.  Mandatory Entry: You must be a follower of Eat Cake For Dinner via Facebook, Pinterest, e-mail, Google+ OR Bloglovin'.  Leave me a comment and let me know which way you follow.  

2.  Optional: Leave me a separate comment and let me know your favorite recipe that calls for vanilla extract.

3.  Optional: Follow Melissa's "Baking and Home Products" Pinterest board and leave me a comment letting me know you did.  

**If your name does not link me to a blog, PLEASE be sure to leave me your e-mail address, so I can contact you if you win** 

Giveaway will end on Tuesday, June 25th and I will announce the winner on Wednesday, June 26th.  Winner must respond within 72 hours or a new winner will be selected.

Giveaway is sponsored by Independent Watkins Consultant, Melissa #403264, but all opinions expressed herein are my own.

You can also visit Melissa on her BlogFacebookBloglovin' and Pinterest

Saturday, June 15, 2013

Cream Cheese Pumpkin Bread

It's not my fault I made a pumpkin recipe in June.

America's Test Kitchen had to go and show a Fall episode.

Don't they know pumpkin is my weakness and that I can only resist for so long?

I had pumpkin, cream cheese and buttermilk that were all expiring and this recipe couldn't have come about at a better time. 
The smell that permeated through my house while I cooked the pumpkin was intoxicating.  America's Test Kitchen says the reason they cook the pumpkin is to get rid of that canned pumpkin flavor.  I, myself, have never noticed a "canned" pumpkin flavor, but I would cook it any day of the week just to smell that smell again.

The streusel topping is so crunchy and so delicious.  The flavor is ridiculous and the texture is moist, but not gooey.

This bread stays fabulous for several days and the top remains crunchy.   I can't wait to use this streusel on other breads like banana and cinnamon swirl.  This recipe is a winner.
Cream Cheese Pumpkin Bread
adapted from: America's Test Kitchen
(Printable Recipe) or (Printable with Picture)

1 (15 oz.) can pumpkin puree
1 1/2 tsp. cinnamon
1 tsp. salt
1/4 tsp. ground nutmeg
1/8 tsp. ground clove
1 c. sugar
1 c. light brown sugar
4 oz. cream cheese
1/2 c. vegetable oil
1/4 c. buttermilk
4 large eggs
2 c. all-purpose flour
1/2 tsp. baking powder
1/2 tsp. baking soda
1 c. mini semisweet chocolate chips

Streusel
5 Tbl. light brown sugar
1 Tbl. all-purpose flour
1 Tbl. unsalted butter
1 tsp. cinnamon
1/8 tsp. salt

Add pumpkin puree to a large saucepan along with the cinnamon, salt, nutmeg and ground cloves.  Heat over medium heat until mixture measures 1 1/2 cups; about 6 minutes.  Measure and add back to the saucepan.  Stir in the sugar, brown sugar, cream cheese and vegetable oil.  Heat until cream cheese is melted.  Whisk until smooth.  In a separate dish, whisk together the buttermilk and eggs.  Slowly add mixture into to the pumpkin puree, whisking constantly.  Remove from heat.  Combine the flour, baking powder and baking soda and fold into wet mixture.  Allow to cool for a few minutes while you make the streusel.

For the streusel: combine all ingredients and using your clean hands, work the butter into the other ingredients until it resembles coarse sand.

Quickly stir the chocolate chips into the slightly cooled pumpkin mixture.  They will begin to melt, so stir quickly.  Divide batter between two, well greased, 9x5-inch loaf pans.  Sprinkle streusel topping evenly over loaves.  Bake at 350 degrees for 50 minutes or until a toothpick inserted in the center comes out with a few moist crumbs.  Cool in pan 20 minutes, remove and cool completely.  Yield: 2 loaves.        

Jenn's Notes: I made this exactly as I typed it above and it is fabulous.

Young Chefs Cookbook Winner Announced


Thanks to everyone who entered my cookbook giveaway.  A winner has been selected using random.org.  Don't worry if you didn't win, you can purchase the cookbook HERE or I have also seen it at Costco.

Plus, I have the BEST giveaway coming up on Tuesday for one of my FAVORITE products.  So, be sure to come check it out.

The WINNER is . . . Helena Chamberlain!

Congratulations!

Please contact me within 72 hours or a new winner will be selected.

Thursday, June 13, 2013

Chicken, Bacon, Ham, Asparagus and Cheddar Parmesan Pasta

Is that title a mouthful or what?  Pretty much everything but the kitchen sink is in this pasta and it is SO GOOD!  

I'm not going to lie . . . this dish was quite a bit of work.  Definitely a Sunday dish and a dish you make when you have a helper in the kitchen.  All of the steps are super simple, nothing hard about it, but there is just a lot to do.

A warm bed of pasta is topped with a rich and creamy cheesy sauce, with shredded chicken, brown sugar ham, smoked peppery bacon, roasted asparagus and diced tomatoes.  It turned out amazing and tasted like a fancy Italian meal that will impress anyone who devours it.  I served it alongside some FABULOUS FOCACCIA and I savored each and every bite.

If you have any pasta loving Dad's, this would be awesome for Father's Day!
Chicken, Bacon, Ham, Asparagus Cheddar Parmesan Pasta
adapted from: Just Get Off Your Butt and Bake
(Printable Recipe) or (Printable with Picture)

1 c. cooked chicken, shredded (rotisserie)
3/4 c. ham, diced
1 Tbl. brown sugar
1/2 Lb. bacon
3/4 bunch of asparagus
olive oil
salt and pepper
1 roma tomato, diced
spaghetti noodles

Sauce:
2 Tbl. unsalted butter
3-4 Tbl. flour
1 garlic clove, minced
1 c. milk
1 c. low-sodium chicken broth
1 c. half-and-half (I used fat-free)
1/4 tsp. onion powder, or to taste
1/4 tsp. garlic powder, or to taste
1 tsp. white sugar
black pepper
1 1/2  c. Cheddar cheese, grated
1/2 c. Parmesan cheese, grated

Trim about an inch off the bottom of each asparagus spear and discard.  Toss asparagus with a little olive oil and sprinkle with salt and pepper.  Spread out onto a baking sheet and roast in a 400 degree oven for about 10-15 minutes, flipping halfway through.  When done, allow to cool for a few minutes, then chop into 1-inch pieces; set aside.   

Heat a large skillet over medium heat.  Add the bacon and cook until crispy and remove to a paper towel lined plate; set aside.  Discard all but a teaspoon of the bacon grease.  Add the diced ham and 1 Tablespoon of brown sugar.  Stir together and cook until the ham is golden and sugar is absorbed, about 1-2 minutes.  Remove to a bowl; set aside.

Meanwhile, bring a large pot of water to a boil and cook the pasta according to package directions.

For the Sauce: To the same skillet, melt the butter.  Add the minced garlic and saute for about 30 seconds.  Whisk in the flour, one Tablespoon at a time, until a paste forms.  Allow to cook for a few minutes, stirring occasionally.  Gradually whisk in the milk, then the broth and last the half-and-half.  Whisk until smooth.  Season with onion powder, garlic powder, sugar and black pepper.  Continue cooking until thickened.  Whisk in the Cheddar cheese and Parmesan cheese and stir until smooth.  Taste and adjust seasonings, if needed.    

Add the cooked shredded chicken, the fried ham and the chopped asparagus to the sauce and heat on low until everything is heated through.  

Serve sauce over noodles and top with diced tomato and cooked and crumbled bacon.     

Jenn's Notes:  I thought this was delicious, but I felt like the chicken could be omitted.  


Serve with:

Tuesday, June 11, 2013

Key Lime Bars with an Animal Cracker Crust

The warm weather makes me crave tart and sweet citrus desserts.

Key lime is one of those citrusy desserts and I needed some ASAP.

These are the BEST key lime bars I have ever eaten.

Cook's Illustrated tested both regular limes and key limes and the taste testers couldn't tell the difference, so for the sake of juicing 4 regular limes vs. 20 key limes, they opted to use regular limes in this recipe.

I, myself, opted for bottled key lime juice.  I really love that stuff.

I like to pour myself a glass of it and drink it on hot days.
NOT.  Just seeing if you were paying attention :)

The crust is phenomenal.  The brown sugar gives it a toasted nutty caramely flavor.  I thought it would be too much, since it is almost as thick as the filling, but it was perfect.  This crust would also be fabulous with a banana cream pie.
Key Lime Bars w/ an Animal Cracker Crust
5 oz. animal crackers (about 2 1/2 cups)
3 Tbl. packed brown sugar
pinch of salt
4 Tbl. unsalted butter, melted

Filling:
2 oz. cream cheese, softened (I used light)
pinch of salt
1 Tbl. lime zest, grated (I only added zest of 1 lime)
1 (14 oz.) can sweetened condensed milk
1/2 c. fresh lime juice 
   about 4 regular limes or 20 key limes
1 large egg yolk

Preheat oven to 325 degrees.  Line an 8x8-inch baking pan with aluminum foil, press into corners and up the sides of the baking dish, leaving an overhang to easily remove bars when done.  Spray with cooking spray.  For the crust:  Add animal crackers, brown sugar and a pinch of salt to a food processor.  Process until you have fine crumbs.  Drizzle in melted butter and pulse until crumbs are evenly moistened with butter.  Press crumbs evenly and firmly into bottom of prepared pan.  Bake until golden brown and fragrant, about 18 minutes.

Meanwhile, for the filling:  Stir together softened cream cheese, a pinch of salt and grated lime zest.  Whisk in the sweetened condensed milk.  Add the lime juice and whisk until smooth and creamy.  Last, whisk in the egg yolk.  Pour mixture over warm baked crust and spread out evenly.  Return to oven and bake until filling is set and barely beginning to pull away from the sides of the pan, about 17-20 minutes.

Let cool on wire rack to room temperature; about 1 1/2 hours.  Cover with foil and refrigerate until chilled, at least 2 hours.  Remove from pan using the foil overhang; cut into 16 squares and serve.  

Jenn's Notes:  I used bottled Nellie & Joe's Key Lime Juice (found at most grocery stores) instead of fresh lime juice.  These bars are the best I have had and I wouldn't change a thing from what I did.     

Sunday, June 9, 2013

Young Chefs Cookbook GIVEAWAY Plus Homemade Raspberry Cream Cheese Spread

*Giveaway is now closed.  Click HERE to see the winner*

A cookbook for kids giveaway.  

This cute book is made to help you teach your kids to cook from the ground up.  You start off simple by showing them how to crack eggs and measure flour and work up to teaching them how to get something hot out of the oven.

At the top of each recipe, there is a picture of a kitchen tool (blender, microwave, oven, etc. . . ).  So you can quickly glance at the recipe and see if your child will be able to handle it by themselves or if they will need a little adult help.  There are super simple recipes and there are more involved recipes.
Some of the recipes I can't wait to try are the Pink Smoothies, Cowboy Eggs, Blonde Trail Mix, Best Nachos Ever, Grandma's Applesauce Cookies and
Special Day Ice Cream Cake.

This time, I chose to try the raspberry cream cheese spread.  This recipe requires no adult help.  I love me some bagels and it never crossed my mind to make my own flavored cream cheese spread.  It was so easy and it was seriously DELICIOUS, not to mention a lot cheaper than store-bought flavored cream cheese.

Overall, I think this cookbook is fun and easy to follow.  If you are interested in showing your kids how to cook, then this is the perfect way to get them started.
Raspberry Cream Cheese Spread
4 oz. cream cheese, softened
3 Tbl. raspberry jam (or favorite jam)
2 Tbl. powdered sugar
2 bagels, cut in half

In a small bowl, mix together the cream cheese, jam and powdered sugar until smooth and creamy.  Serve on bagels or toast.


*TO ENTER THE GIVEAWAY*
Simply leave me a comment on this blog post with your favorite "kid food."  If you don't have a favorite kid food, just tell me your favorite food.  If your name does not link me to a blog, be sure to leave your email address, so I can contact you if you win.  Good luck.

Bonus Entries (not mandatory): Follow Eat Cake For Dinner on Google Friend Connect, Facebook, Pinterest, Google +, email and/or Bloglovin'.  All are found on the right hand side of my blog.  Leave me a separate comment telling me which way you follow. 


Giveaway will end on Friday, June 14th and I will announce the winner on Saturday, June 15th and contact the winner via email. Winner must respond within 72 hours or a new winner will be selected.


The publisher provided me with a copy of this cookbook, but the opinions expressed herein are my own.

Friday, June 7, 2013

Chicken Broccoli Supreme - No Canned Soup

It's been awhile since I posted a chicken, broccoli and rice casserole recipe.

This one is different because it has poppy seeds in it and since Ritz crackers make everything better, I crushed them up and sprinkled them on top instead of the same-old bread crumb.  Crushed Ritz crackers not only add a rich and buttery flavor, but they give the casserole a nice soft crunch in each bite.  So so good when mixed with the creamy sauce, melty cheese and crisp broccoli.  

You might also like:
Chicken Broccoli Supreme
From: Jenn@eatcakefordinner

2-3 c. fresh broccoli, steamed
1 1/2 c. cooked chicken, shredded
1 1/2 c. cooked rice
1/2 c. Cheddar, grated, for topping

Sauce:
2 Tbl. unsalted butter, melted
3-4 Tbl. flour
1/2 c. low sodium chicken broth
1 1/2 c. milk
3/4 c. half-and-half (I used fat-free)
salt and pepper
1/4 tsp. onion powder, or to taste
1/4 tsp. garlic powder, or to taste
1/4 tsp. lemon pepper, or to taste
3/4 c. Cheddar cheese, grated

Topping:
1 pkg. Ritz crackers, crushed (I used low-fat)
2 Tbl. unsalted butter, melted
1/2 Tbl. poppy seeds

Preheat oven to 350 degrees.  For the sauce: In a large saucepan over medium heat, melt the butter.  Whisk in the flour, one Tablespoon at a time, until a thick paste forms.  Cook for a few minutes.  Gradually add the chicken broth, whisking constantly to prevent lumps from forming.  Gradually whisk in the milk and the half-and-half.  Season with salt, pepper, onion powder, garlic powder and lemon pepper.  Continue cooking over medium heat until thickens and reaches a good creamy sauce consistency.  Taste and add more seasonings, if needed.  Whisk in 3/4 cup of grated Cheddar cheese and stir until melted.  

Layer the steamed broccoli, cooked chicken and cooked rice in a greased 9x13-inch baking dish.  Pour sauce over the top.  Sprinkle with 1/2 cup of shredded Cheddar cheese.  

For the topping: Combine crushed crackers, melted butter and poppy seeds.  Toss together until crackers are evenly coated in butter.  Sprinkle over the top of the casserole.  Bake in preheated oven for 25-30 minutes or until hot and bubbly and crackers are lightly toasted.  Makes: 4 big servings

Jenn's Notes: Instead of mixing my crushed crackers with melted butter, I sprayed them lightly with butter spray to save a few calories.  I figured most people won't have butter spray, so I included melted butter in the recipe instead.


Wednesday, June 5, 2013

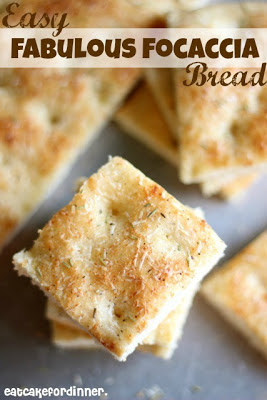
Easy and Fabulous Focaccia Bread

Who knew homemade Focaccia Bread was SO EASY to make?
I mean, REALLY easy to make.

All you do is throw everything in your mixer and mix until combined and knead for five minutes.  Let it sit for 15 minutes, spread out onto a cookie sheet, let set 30 minutes, make indentations using your fingers, brush with olive oil and add some seasonings and bake.  No skills required here.  
The end result is AMAZING.  It tastes incredible plain, it is fabulous dipped in pasta sauce and my house smelled like an Italian Restaurant while it baked.

We even made grilled ham and cheese sandwiches with the leftover bread the next day and it still tasted amazing.

I have made this a few times now and we absolutely LOVE it.  It's my new favorite thing to serve with pasta.

Easy & Fabulous Focaccia Bread
1 c. warm water
3 Tbl. softened butter
2 Tbl. dry milk powder
3 Tbl. sugar
1 1/2 tsp. salt
3 c. bread flour
2 1/4 tsp. instant yeast

Topping:
2 Tbl. olive oil
3 Tbl. grated Parmesan cheese
1 tsp. dried rosemary
1/2 tsp. garlic salt 

Add the warm water, butter, dry milk powder, sugar, salt, flour and yeast to the bowl of your stand mixer.  Mix until combined and knead for 5 minutes on low using the dough hook.  Add more flour or water, if needed.  Dough should remain in a ball as it kneads and should not stick to the side of the bowl.  After dough is finished kneading, place it on a lightly floured surface and cover with saran wrap.  Let the dough rest for 15 minutes.  After dough has rested, knead by hand for one minute.  

Press dough into a large, greased, jelly-roll pan, until dough is about 1/4''-1/2'' thick.  It will not cover the entire surface of the pan.  Cover and let rise for 30 minutes.  Preheat oven to 400 degrees.  Using your fingers, press dough in random spots to make indentations about 1-inch apart from each other.  Brush dough with olive oil and sprinkle with Parmesan, rosemary and garlic salt.  Bake in preheated oven for 13-15 minutes or until lightly browned.  Allow to cool slightly, then cut into squares and serve.    

Jenn's Notes: My dough was perfect with the measurements listed.  I did not have to add any extra water or flour.  I let my dough rise for about 50 minutes, because my house was cooler, so it took longer.  I did not have garlic salt, so I used garlic powder and a little salt.  I also added some Italian seasoning.  This bread is fabulous.       


adapted from: Chef-In-Training, who adapted it from Taste of Home
i'am author of old country buffet coupons
that give mcdonalds coupons
breakfast coupons you also can find recipe from 
banana nut bread paula deen
almond roca