Wednesday, April 2, 2014

Cake Boss Peanut Butter Chocolate Chip Cookies


Today was and still is so rainy.  What makes a rainy day better?  Chocolate Chip Cookies :)

The first thing that caught my eye with this recipe was seeing they were from The Cake Boss!  I love that show and I love his new kitchen line at Kohl's (I'll take one of everything please) . . . But, these cookies have such a weird ingredient in them, that I had to make them the second I read the recipe.  What can I say . . . I was curious :)
They are definitely not your average chewy chocolate chip cookie, but they are good and unique.  They are really soft and moist and a little chewy.  You can taste the sweetened condensed milk and the flavors all work well together.  I made three different versions - regular milk chocolate chip, milk chocolate chip with white chip and milk chocolate chip with butterscotch chips.  The butterscotch chip version was my favorite.
Cake Boss Peanut Butter Chocolate Chip Cookies
From: The Cake Boss, as seen on The Daily Smash
(Printable Recipe) or (Printable with Picture)

3/4 c. creamy peanut butter
1/4 c. shortening
1/4 c. packed brown sugar
1 egg
1 (14 oz.) can sweetened condensed milk
1 tsp. vanilla
1 1/2 c. all purpose flour
2 tsp. baking powder
1/2 c. milk chocolate chips
1/2 c. peanut butter chips (or white chocolate or butterscotch)

Preheat oven to 325 degrees.  Cream together peanut butter, shortening and brown sugar.  Mix in the egg and then the sweetened condensed milk and vanilla.  Mix until creamy.  Combine the all-purpose flour and baking powder and mix into wet ingredients.  Stir in the chocolate chips and peanut butter chips.

Drop spoonfuls of dough (about 1 1/2 Tablespoons each) onto lightly greased baking sheet and bake for 10 minutes - do not overbake.  

Jenn's Notes: Since I made several versions of this cookie, I did not stir the chips into the dough, I pressed them onto the top of the dough balls before baking.  

Monday, March 31, 2014

Six Sisters' Stuff Cookbook Review and 10 Book Giveaway Plus Oven-Baked Tacos

The Publisher provided me with a copy of this book for the purpose of this review, but all opinions expressed herein are my own.

A Year With Six Sisters' Stuff: 52 Menu Plans, Recipes, and Ideas to Bring Families Together

This is the newest cookbook from the sisters behind the popular blog, Six Sisters' Stuff.  

I didn't waste any time diving into this cookbook.

I loved their first book, but I think I like this 2nd book better :)  The recipes are all simple, family friendly, dishes with familiar ingredients and there is a mouthwatering photos of every recipe.

The layout is different than their first book.  Rather than being divided into specific categories, it is divided by meal plans.  There are 52 meal plans in the book, each of which contains a main dish, a side dish and a dessert.  Some of the recipes are from scratch while others use mixes and short-cuts.  I think there is a really good variety of dishes.
  First, I made these Oven-Baked Tacos.  I always love new taco recipes.  This one is super simple and perfect for a week night.  Baking the tacos softens the shells a bit which makes them a little easier to eat, plus it melts the cheese which holds the filling together better.  

Then, I tried the Chicken Parmesan Crescents, which is now a family favorite and I made the Banana Crumb Muffins which are delish as well.  

Overall, if you want a cookbook full of dishes that your whole family will love, then this is the book for you.  A lot of the recipes remind me of food I grew up eating.  I love it.

You can purchase it at Amazon, Walmart, Deseret Book, Barnes & Noble and other retailers.
Oven-Baked Tacos
adapted from: Six Sisters' Stuff

1 Lb. lean ground beef
1 medium onion, diced
2 cloves garlic, minced
1 (1 oz.) pkg. taco seasoning
1 (15 oz.) can black beans, drained and rinsed
1 c. chunky salsa
12 hard taco shells
1 1/2 c. shredded Cheddar cheese

Optional toppings: diced tomatoes, lettuce, olives, sour cream, cilantro

Preheat oven to 400 degrees.  In a large skillet over medium heat, saute the ground beef.  Just before it is cooked through, add the diced onion and saute until tender.  Add the minced garlic and saute 30 more seconds.  Add taco seasoning and stir to combine.  Stir in the beans and salsa.  Reduce heat and simmer for 5 minutes.  In a 9x13-inch baking pan, line up all taco shells.  Fill each one with a couple scoops of the beef mixture and pack down into the shell.  Top each taco with shredded cheese.  Bake for 5-10 minutes or until cheese is melted.  Serve with your favorite toppings.  Makes 4-6 servings.    

a Rafflecopter giveaway
Winners will be notified by Shadow Mountain and books will be shipped by Shadow Mountain.

Saturday, March 29, 2014

Weekly Menu Planning Saturday #3

Sunday
Bob's Basil Rub Chicken with mashed potatoes, gravy and Easy Overnight Dinner Rolls


Monday
Mini Biscuit Chicken Pot Pies with steamed broccoli
Use leftover Bob's Basil Rub Chicken


Tuesday


Wednesday


Thursday


Friday
Sweet and Sour Chicken Stir Fry
Buy extra broccoli for the Mini Biscuit Pot Pies and an extra red pepper for the Roasted Brussels Sprout and Bacon Carbonara.


Saturday
Menu-Plan Day and Take-Out Night


Wednesday, March 26, 2014

Magnolia Bakery Famous Banana Pudding

Magnolia Bakery is a bakery that I have always dreamed of going to.  I have one of their cookbooks and I have made many treats out of it, but I always wondered if the recipes really are the same as the treats they serve in the bakery.

A few months ago I was on vacation in L.A. and discovered there is a Magnolia's down there.

Getting there was quite the adventure.

I don't know how anyone does it in California.  GPS would have to be a must in your car.  Just getting from San Diego to L.A., I counted 7 different freeways we had to merge onto and that drive was less than 2 hours.  Oh and don't accidentally get off the wrong exit, because you can't just flip around and get right back on it.  You will find yourself taking a very very long detour . . . not speaking from experience or anything :)

I have realized it is a piece of cake driving here in Utah and the traffic here is nothing.

Anyway, Magnolia's was so cute inside.  It was late when we got there and a lot of things were sold out, but I did leave with half a dozen cupcakes and of course I tried their Banana Pudding.

Their Banana Pudding is one of the things they are famous for.
It was delicious and the employee told me it really is the recipe in the cookbook.

So, I made it when I got home from vacation.  It is so light and fluffy and feels like a cloud of amazingness in your mouth.  It is sweet and the bananas and Nilla Wafers make it extra special.

I could have eaten the entire batch by myself.
Magnolia Bakery Famous Banana Pudding
1 (14 oz.) can sweetened condensed milk     
1 1/2 c. ice cold water
1 (3.4 oz.) box vanilla instant pudding mix
3 c. heavy cream
1 tsp. vanilla extract
4 c. sliced bananas
1 (12 oz.) box Nilla Wafers

In a large bowl, beat together the sweetened condensed milk and water until well combined.  Add the pudding mix and beat well.  Cover and refrigerate for 3-4 hours or overnight.  It is very important to allow the proper amount of time for the pudding mixture to set.

In a large bowl, whip the cream and vanilla until stiff peaks form.  Gently fold the whipped cream into the pudding mixture until no streaks of pudding remain.  

Serve with sliced bananas and crushed Nilla wafers.  Serves: 8-10 

To serve this like Magnolia Bakery: Make three layers of Nilla Wafers, sliced bananas and pudding in a 4-5 quart capacity glass bowl.  Cover tightly and refrigerate for 4 hours up to 8 hours, but no longer.   

Jenn's Notes: Magnolia's recipe does not add vanilla extract.  I prefer to serve this as individual servings and I add the sliced bananas just before I eat it, so they don't turn brown.  

Sunday, March 23, 2014

Strawberry Swirled Lemon Poppy Seed Bread

Be sure to follow me on bloglovin' and never miss a recipe.
I look forward to Saturdays just so I am able to sleep in.  I love my sleep and I usually have no problem sleeping in, but last Saturday I woke up bright and early.  So, what's a girl to do? 

Make a delicious loaf of lemon poppy seed bread for breakfast of course.

When "The Mr." woke up, I had a fresh piece waiting for him, he ate it and then immediately said, "I better eat another piece of that right now."  Needless to say, it is absolutely delicious.  The strawberry jam layer adds a bright flavor.

You can easily switch it up with another flavor of jam, like blueberry, peach or raspberry.
The texture is soft and moist and exactly what I look for in a quick bread recipe.

I like to add a little meringue powder to my glaze and that way it gets nice and hard, like an icing you would get from a bakery.  It's my new little trick.  

This is the perfect Springtime Bread and I have already made it twice.

I betcha can't eat just one slice :)

You might also like:
Almond Poppy Seed Bread with Orange Glaze
Orange Poppy Seed Zucchini Bread with Orange Glaze
Lemon Zucchini Bread with Lemon Glaze
Homemade Peach Freezer Jam
Strawberry Swirled Lemon Poppy Seed Bread
From: Jenn@eatcakefordinner
(Printable Recipe) or (Printable with Picture)

1/4 c. unsalted butter, softened
3/4 c. sugar
1 egg
1 egg white
1 tsp. vanilla extract
1 tsp. imitation lemon extract (or 2 tsp. grated lemon zest)
3/4 c. non-fat plain Greek yogurt
1 1/2 c. all-purpose flour
1 tsp. baking powder
1/4 tsp. baking soda
1/8 tsp. salt
1 1/2 Tbl. poppy seeds
1/3 c. strawberry jam 

Lemon Glaze
1 c. powdered sugar
1 tsp. imitation lemon extract (or grated lemon zest)
1-2 Tbl. milk (or fresh lemon juice)
1 tsp. meringue powder, opt. (this helps the icing harden)


Preheat oven to 350 degrees.  In a medium bowl, cream together the butter and sugar.  Add the egg, egg white, vanilla and lemon extract and mix until well blended.  In a separate bowl, combine the flour, baking powder, baking soda, salt and poppy seeds.  Add dry ingredients and greek yogurt alternately to the batter, starting and ending with dry and mix until just combined. 

Spread half of the batter into a 9x5-inch loaf pan.  Top with strawberry jam, leaving a small border around the edge.  Do not swirl the jam.  Top with remaining batter and carefully spread out evenly.  Bake for 45-50 minutes or until a toothpick inserted in the center comes out clean.  Cool in pan 10 minutes, then invert to a wire rack and cool completely.  Meanwhile, make the glaze.

For the Lemon Glaze: Combine all ingredients and mix until smooth and creamy, adding enough milk to reach desired glaze consistency.  Pour over cooled bread and allow to harden.  If you are in a hurry, you can pour this over the warm bread too.  

Jenn's Notes: I am personally a big fan of imitation lemon extract.  If you do not care for it, be sure to use fresh lemon zest instead.

Slightly adapted from: Cooking Light

Saturday, March 22, 2014

Weekly Menu Planning Saturday #2

Sunday

Monday
Use leftover Soft and Chewy French Bread to make the sandwiches
Tuesday


Wednesday
Use extra cottage cheese from Easy Baked Ziti


Thursday


Friday
Use leftover sausage from Hash Brown Sausage Breakfast Casserole and any leftover peppers and cheese from the week.


Saturday
Menu-Plan Day and Take-Out Night


For Dessert

Thursday, March 20, 2014

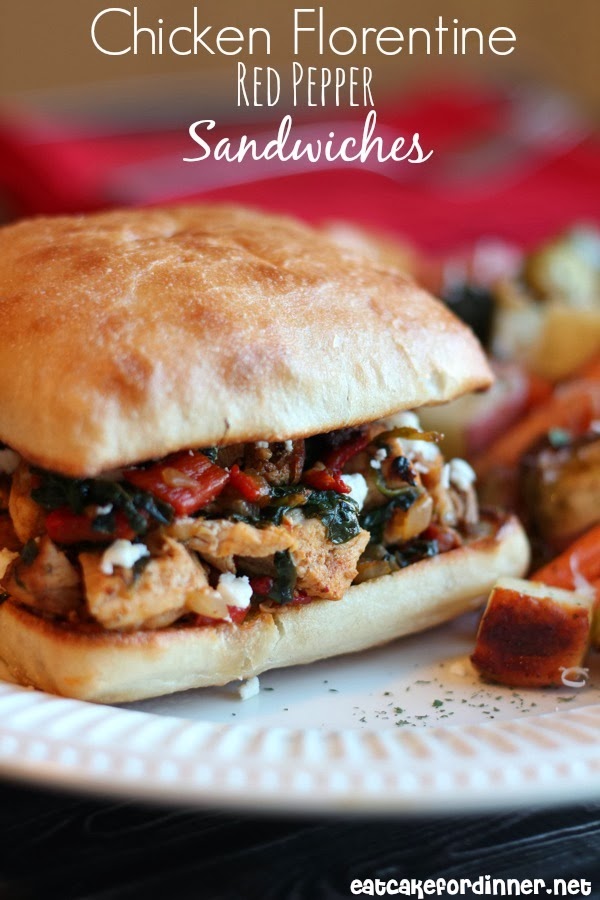
Chicken Florentine Red Pepper Sandwiches

This sandwich is soooooo GOOD.  It is loaded with flavor.  I adapted this awesome marinade recipe from these Sweet Dijon Pork Chops for this chicken and it is so flavorful.  We served with our favorite Roasted Ranch Veggies.

This sandwich filling is delicious, but you don't have to stop at sandwiches.  It is so versatile. You could make it into a pasta dish, a quesadilla filling, a salad topping, a creamy soup, a pizza topping and a grilled cheese.  Or, how about adding artichokes and cream cheese to make an amazing dip?  
Chicken Florentine Red Pepper Sandwiches
From: Jenn@eatcakefordinner
(Printable Recipe) or (Printable with Picture)

2 chicken breasts, marinated
2 Tbl. olive oil (I used Avocado oil)
1 roasted red pepper, chopped (from a jar or homemade)
2 heaping cups fresh spinach, chopped
1/3 c. finely chopped onion
2 garlic cloves, finely minced
2 Tbl. crumbled Feta cheese, for serving
2 sandwich buns (I used Ciabatta), buttered and toasted

Sweet Dijon Chicken Marinade
juice of one orange (or lemon)
3 Tbl. Dijon mustard
1 Tbl. soy sauce
1/4 c. light brown sugar
a few dashes Worcestershire sauce
1/2 tsp. Italian seasoning
1 garlic clove, minced
1 Tbl. chopped green onions

For the marinade: Whisk together all ingredients and pour over chicken.  Allow to marinate as long as possible, preferably overnight.

To prepare:  Heat two medium skillets over medium heat.  Add one Tablespoon of oil to each of the pans.  To one pan, add the marinated chicken breasts, discarding the marinade.  Cook until internal temperature registers 165 degrees on an instant-read thermometer, flipping halfway through.  You will want to get some good color on the chicken.  

To the other pan, add the roasted red peppers and onion and saute until onion is tender.  Add the spinach and garlic and heat until spinach is cooked down.  Reduce heat to low.  Chop up the cooked chicken and add to the pan with the red peppers and spinach.  Stir to combine.  Serve on toasted buns and top each with some Feta cheese.  Serves 2.  

Jenn's Notes: You could add another chicken breast or two to the same marinade recipe and not have to double it. 
i'am author of old country buffet coupons
that give mcdonalds coupons
breakfast coupons you also can find recipe from 
banana nut bread paula deen
almond roca