Wednesday, July 6, 2011

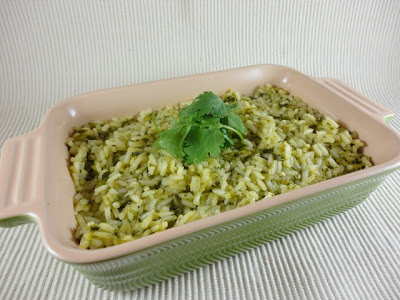
Mexican Green Rice

I LOVE Mexican Food and I LOVE rice!  So, Mexican Rice is even better!  This rice turned out delicious!!  It has those Mexican flavors that I love, but it was not too spicy.  I think kids could even eat this one?  I served this with one of my favorite tacos (I will post recipe soon)!  I think this rice would be so good in a taco salad or in a copy-cat Cafe Rio salad!      
Mexican Green Rice
adapted from: The Naptime Chef

3 c. low-sodium chicken broth
2-3 poblano peppers, seeded and deveined, roughly chopped
cilantro, to taste
1 tsp. kosher salt
2 Tbl. olive oil
2 c. white rice
1 small onion, finely chopped
2 garlic cloves, minced

Bring chicken broth, poblanos and salt to a boil.  Simmer 10-12 minutes or until chiles are soft.  Pour mixture into a blender.  Let cool a few minutes, then add cilantro and liquify.  If you do not want any chunks, pour blended liquid through a strainer before adding to the rice.  Heat the olive oil in a large pan.  Add the onion and saute until soft.  Add the garlic and cook for 30 more seconds.  Add the rice and stir well.  Last, add the blended chile liquid.  Simmer on medium-low, covered, stirring occasionally, for about 20 minutes or until rice is cooked completely.  If all the liquid is absorbed and the rice is not quite tender, just add a little water and cook for another few minutes.  Fluff with a fork before serving.  

Jenn's Notes:  I made a half of a batch of this rice and I used one very large poblano and a handful of cilantro.  I had to add extra liquid towards the end, because my rice was still a little crunchy and all the liquid had been absorbed.  Half of a batch still made tonz!  Way more than two people could eat.  Next time, I will try 1/4 of a batch or plan another meal for the extra rice!!  I really really liked this rice!   

Monday, July 4, 2011

Homemade Chocolate Chip COOKIE DOUGH Ice Cream

EGGLESS COOKIE DOUGH!!!  One of the greatest creations EVER!  I found this recipe over at Fake it Frugal and was immediately intrigued.  Could I really eat as much cookie dough as I wanted without having to worry about consuming raw eggs!  Yes, this eggless cookie dough tastes exactly like regular cookie dough!  Genius.  


If you have ever purchased a carton of cookie dough ice cream, then you have probably come across opening the carton only to discover that someone has already eaten all of the cookie dough out it and you are left with a carton of plain vanilla ice cream.  Well, you never have to worry about that again. Just whip up a batch of this eggless cookie dough and problem solved!!!  The possibilities are endless . . . . . add some to homemade vanilla ice cream, chocolate fudge ice cream or mint ice cream?  Or switch up the cookie dough, instead of adding chocolate chips, add mini m&m's, toffee chips, Oreo's or chopped up candy bar!  Yummy!
Make your batch of cookie dough.  Roll up tightly in some parchment or wax paper and refrigerate until firm, about 30 minutes - 1 hour
When firm, unroll and cut into squares (whatever size you want your chunks to be)
Add to your ice cream and enjoy every last bite!

Eggless Chocolate Chip Cookie Dough
adapted from: Fake It Frugal

4 Tbl. melted butter
1/2 tsp. salt
1/2 tsp. vanilla extract
6 Tbl. sugar
6 Tbl. light brown sugar
1 c. + 2 Tbl. all-purpose flour
1/4 c. water
1/2 c. mini chocolate chips

Combine melted butter, salt, vanilla, sugar and brown sugar.  Add the flour and water and stir to combine.  Add the chocolate chips and stir well.  

Ice Cream
1.5 quart vanilla ice cream, slightly softened
1/3 c. light brown sugar


Add light brown sugar to slightly softened vanilla ice cream (this will make it taste rich).  Add the cookie dough chunks and place in an air-tight container and freeze.  You do not want the ice cream to get too soft or it won't re-freeze well.  
  
Jenn's Notes:  I used a wooden spoon to stir together all of the cookie dough ingredients, no need to dirty your mixer and beaters.  The dough is pretty sticky and that is why I refrigerated it until it was firm.  You can use it right away, it will just be a little messier.  I added my cookie dough to homemade vanilla ice cream and it was DIVINE.  I posted a half of a batch of the original recipe and it will still give you TONZ of cookie dough.  You could always cut the recipe back some more or just keep the extra in the fridge or freezer to snack on!!    

Friday, July 1, 2011

Chocolate Cupcakes with Peanut Butter Mousse

If a double decker version isn't your thing, try a regular one!
The name of these cupcakes says it all!   Chocolate Cupcakes - Delicious and Peanut Butter Mousse - Divine!  If you are a peanut butter and chocolate fan you will go nuts over these cupcakes.   The cupcake is great, but the mousse is really the star!  It is so incredibly light thanks to the whipped cream and it has just the perfect amount of peanut butter flavor.  I think this mousse would be AMAZING layered in a trifle dish!

Chocolate Cupcakes with PB Mousse
adapted from: Stephanie's Kitchen

Peanut Butter Mousse
3 oz. cream cheese, softened
1 c. powdered sugar
1/4 c. milk
3/4 c. creamy peanut butter
2 c. heavy whipping cream
1 Tbl. vanilla extract

Using a mixer, whip the heavy cream and vanilla until stiff peaks form.  Put in the refrigerator.  In a separate bowl, cream together the cream cheese, powdered sugar, milk and peanut butter.  Stir in about 1/3 of the whipped cream to lighten up the mixture.  Then, carefully fold in the remaining whipped cream.  It may take a minute or so until it is combined and no white streaks remain.  Refrigerate until very very cold (several hours).  

Chocolate Cupcakes
2 1/4 c. cake flour
1 tsp. baking soda
1/2 tsp. baking powder
1 tsp. salt
1/2 c. cocoa powder
1 1/2 c. sugar
2 large eggs
1 tsp. vanilla extract
3/4 c. vegetable oil
1 c. cold water
1/2 c. sour cream
1 c. chopped peanut butter cups, for garnish 

Preheat oven to 375 degrees.  Sift together the flour, baking soda, baking powder, salt, cocoa and sugar; set aside.  Cream together the eggs, vanilla, oil, water and sour cream.  Slowly add the dry ingredients and mix until well combined.  Scoop evenly between 24 lined muffin cups and bake 18-20 minutes or until toothpick comes out clean.  Cool slightly, remove from pans and set on cooling rack to cool completely.  Yield: 24 cupcakes.    


To assemble double layered cupcakes:  Remove wrappers from cupcakes.  Cut cupcakes in half horizontally.  Pipe mousse onto the bottom cupcake half.  Place the top half of the cupcake over the mousse.  Pipe more mousse on the top of the cupcake.  Top with chopped peanut butter cups.  Serve immediately or keep in the refrigerator.      


Jenn's Notes:  I cut the cupcake recipe in 1/4 and had enough batter for exactly six cupcakes.  I baked mine for 18 minutes and they were perfect.  I made half of the mousse and had tonz leftover.  If you end up doing single layer cupcakes, I would definitely cut the mousse in half or you will have way too much.  Immediately after the cupcakes cooled, I tried to pipe on the peanut butter mousse.  It was way too soft and got a little messy.  So, if you are going to make a double layer cupcake make sure to refrigerate the mousse for several hours or overnight if possible.  I don't think the double layered cupcakes would transport very well.  The mousse firms up when refrigerated, but it softens pretty quickly once removed from the fridge and it makes the top cake layer a little unstable.  They sure are yummy!!!      

Wednesday, June 29, 2011

Aussie Chicken

Bacon, Cheese, Mushrooms . . . How could you go wrong . . . This chicken was DELICIOUS!  It tasted like something you would order at a restaurant.  The chicken was juicy and so flavorful with all of the yummy toppings.  I served this with Cheesy Bacon Stuffed Potatoes and it was seriously the meal of all meals.  If you have any men in your family that complain about eating chicken, serve them this and I think it will change their mind.  It is one hearty chicken dish. 
Aussie Chicken
adapted from: All Recipes  

4 skinless, boneless chicken breasts
2 tsp. seasoned salt
6 slices bacon, cut in half
1/4 c. Mayonnaise
1 Tbl. prepared mustard
1 Tbl. honey
1/2 Tbl. lemon juice
1 Tbl. vegetable oil
1 c. fresh mushrooms, washed and sliced
2 c. Colby-Monterey Jack cheese, shredded
2 Tbl. fresh parsley, chopped, opt.

Rub the chicken breasts with the seasoned salt.  Cover and refrigerate for 30 minutes.  Preheat oven to 350 degrees.  Place bacon in a large deep skillet.  Cook over medium-high heat until crisp.  Set aside.  Add the sliced mushrooms and saute a minute or two.  Remove from pan and set aside.  In a medium bowl, combine the Mayonnaise, mustard, honey and lemon juice.  Heat oil (or use bacon grease) in a large skillet over medium heat.  Place the breasts in the skillet and saute for 3-5 minutes per side or until browned.  Remove from skillet and place the breasts into a 9x13 inch baking dish.  Apply the honey mustard sauce to each breast and bake in preheated oven for 20-30 minutes or until the chicken is cooked through. Then layer each breast with mushrooms and bacon.  Sprinkle top with shredded cheese.  Bake another 5 minutes until the cheese is melted.  Garnish with parsley and serve.  Yield: 4 servings.    

Sunday, June 26, 2011

Key Lime Pie Ice Cream with Chocolate

I found this ice cream recipe over at The Hungry Housewife and Leslie claims that this is the most delicious ice cream she has ever tasted in her life!  I'm pretty sure Leslie is from Florida (if you're not and I made that up - I'm so sorry!) where they are known for their key limes, so I figured she would know what good key lime ice cream tasted like.  

I figured this would be the perfect dessert to bring to our Father's Day dinner.  It was a stormy day here in Utah and we ate some AMAZING chili and this ice cream was the perfect palette cleanser after that.  It took away that slight tingle your tongue has from the spicy chili.  

I must admit the first bite I took of this ice cream, I couldn't decide if I liked it or not?  It was extremely limey.  So, I ate a few more bites, then a few more and a few more and it got better with each and every bite.  I do think the chocolate is a key ingredient, it helps cut that "bite" you get from all that tartness from the limes.  I ended up really liking this ice cream.  It is light and refreshing.  The flavor almost reminds me of lime sherbet?  If you have any key lime lovers you should really make them this ice cream.  This is a great Summer treat!
Key Lime Pie Ice Cream with Chocolate
adapted from: The Hungry Housewife

1 1/2 c. whole milk
3/4 c. key lime juice, fresh or bottled
1/2 c. heavy cream
1 (14 oz.) can sweetened condensed milk
pinch of salt
zest of 2 limes
3 oz. semisweet chocolate chips
3 sheets plain or honey graham crackers

In a large bowl, stir together the milk, key lime juice, heavy cream, sweetened condensed milk and salt.  Cover and place in the fridge for two hours or until the mixture is cold.  Pour into your ice cream maker and make according to manufacturers directions.  Minutes before the ice cream is done add the lime zest, chocolate chips and broken up graham crackers.  Remove from your ice cream makers bowl and place in a freezer safe container.  Place in freezer until firm.  Notes: this recipe completely fills a 1 1/2 quart ice cream maker while churning, especially when you add the chocolate chips and graham crackers.  

Thursday, June 23, 2011

4th of July Cupcakes

4th of July will be here before we know it!  It is time to start planning a menu.  If you don't already have a dessert planned, these cupcakes would be great.  Individual sized portions and no plates or utensils needed.  I saw this great idea awhile back over at Hoosier Homemade for some New Years Eve cupcakes.  When I saw her picture, I immediately thought of 4th of July.  So, I waited and waited until it was finally time to give these a try.  All you do is melt some hard candy and cut with a star cookie cutter.  Simple as that.  
1.  Buy a package of Jolly Rancher snack size candy stix.  Take out all of the red and pink candies.  The red and pink both looked the same color once they were melted.   
2.  Unwrap a piece of candy and place on a greased piece of foil over a baking sheet.  I only had one star cookie cutter, so I had to do one at a time.  If you have multiple cookie cutters, you could melt as many pieces as needed.  One candy was perfect for one star.  Place in a preheated 350 degree oven until melted, about 2-3 minutes.   
3.  Remove from oven and press your greased star cookie cutter into the melted candy.  Let harden, a few minutes.  (A faster way to go about it is to have two pieces of foil and when you take one out of the oven and press the cookie cutter in to it; set it aside and let harden for a few minutes while you melt another candy on the 2nd piece of foil.  By the time the new piece is melted the first piece will be hardened).  
4.  Peel candy off of foil and break off excess pieces.  Gently press star out of cookie cutter and set aside.  Repeat with remaining candy.  Don't worry if some of the edges break off the star, you can just stick the broken side into the cupcake.  The better your cookie cutter is greased, the better the stars come out.

Decorate as desired!  I would add the stars only a few hours before serving, because if they sit too long in the frosting, they will start to "melt" into the frosting and you end up with watermelon or cherry flavored frosting.   

Vanilla Bean Cupcakes

3 c. cake flour
1 Tbl. baking powder
1/2 tsp. salt
1 vanilla bean, split lengthwise
16 Tbl. unsalted butter, softenend
2 c. sugar
5 large eggs, room temperature
1 1/4 c. buttermilk, room temperature
1 Tbl. vanilla extract

Preheat oven to 350 degrees.  Line 2 cupcake pans with paper liners.  Combine cake flour, baking powder and salt; whisk and set aside.  Add the butter to an electric mixer fitted with the paddle attachment.  Scrape the vanilla bean seeds into the bowl.  Beat on medium-high for 3 minutes, until light and creamy.  Scrape down the bowl and beat one more minute.  Add the sugar, 1/4 cup at a time, beating one minute after each addition, mix in eggs, one at a time until incorporated.  Combine the buttermilk and vanilla.  With mixer on low, add dry and wet ingredients alternately, mixing just until incorporated.  Scrape bowl and mix a few more seconds.  DO NOT OVERMIX.  Divide batter between liners, filling 2/3 full.  Bake 18-22 minutes or until toothpick comes out clean.  Frost cooled cupcakes.  Yield: approximately 30 cupcakes.

Jenn's Notes:  I made a half of a batch of these cupcakes.  The batter is thick and creamy and they bake up beautifully, perfectly round on top.  I baked mine for 20 minutes.  With half a batch, I got 19 cupcakes.  The first night, they were extremely light and fluffy and had amazing flavor.  The 2nd day, they were slightly more dry, but with the frosting on top, they were still delicious.  They have really really good flavor.  I used vanilla bean paste instead of a vanilla bean. 

White Frosting
from: Jenn@eatcakefordinner

1 c. shortening
2-3 tsp. clear vanilla extract
1 tsp. butter extract
1/4 tsp. almond extract   
pinch of salt
4 Tbl. of water or more if needed 
5 c. powdered sugar

Beat shortening until fluffy.  Add vanilla extract, butter extract, almond extract and salt and beat until blended.  Slowly add powdered sugar, one cup at a time, and beat until combined.  Add water as need, to reach desired consistency.  Beat until smooth and fluffy.  The amount of cupcakes this will frost depends entirely on how much you put on each cupcake.  I tend to put a lot of frosting on my cupcakes and I can get about 24-30 cupcakes frosted.  If you end up with 36 cupcakes, you might be slightly short and you might want to add one more cup of powdered sugar to be safe (or just use less frosting per cupcake).            
Sunday, June 19, 2011

Cheesy Bacon Stuffed Potatoes

I saw these on a recent episode of Paula Deen and I am such a sucker for a good potato (and for Paula Deen!), so of course I had to try them.  She said that these might be the best she has ever had?  All I knew was if they tasted anything like my favorite twice baked potatoes then they would be amazing.  

Well, my friends, they were AMAZING.  They do take slightly more planning than my other recipe, because you have to roast some garlic a head of time, but oh it is soooooooo worth it.  Paula used Yukon Gold potatoes and made these bite size, but my grocery store didn't have any Yukon Golds, so I used smaller Russet potatoes.  They are so good and I savored every last bite.  The roasted garlic is a must.  It gives them a nice undertone of garlic, but not overpowering.  Enjoy!
Cheesy Bacon Stuffed Potatoes
adapted from: Paula Deen

2 Lbs. Yukon Gold potatoes
8 oz. cream cheese, softened
1 c. sour cream
1/2 c. cooked bacon
2 tsp. roasted mashed garlic
1 1/2 tsp. salt
1/2 tsp. black pepper
1/4 c. grated Cheddar cheese
1/4 c. grated Monterey cheese
3 Tbl. chopped green onion, opt.

Preheat oven to 400 degrees.  Line a baking sheet with foil.  Boil potatoes until tender, about 8 minutes.  Drain and let cool.  Cut in half crosswise.  Cut a thin slice off the round end, so it will stand up-right.  Scoop out pulp, leaving a 1/4 inch border around the edge.  Combine with all ingredients, reserving 1/4 cup bacon for topping.  Spoon mixture into potato shells and place on baking sheet.  Top with remaining bacon.  Bake about 20 minutes.  Garnish with green onions and reserved bacon.  Yield: 2 dozen appetizer servings. 

Jenn's Notes:  I used small Russet potatoes and baked them in the oven for about and hour, until then were tender (instead of boiling them).  I let cool slightly, then I cut in half lengthwise and scooped out the pulp and combined with the remaining ingredients.  I just squeezed the roasted garlic right into my bowl.  I also added a little seasoned salt to mine and used less regular salt.  I stirred all the ingredients together and left it somewhat chunky.  If you want it to be smooth, you could always mash everything together with a potato masher. I did not garnish mine with green onions.

How to roast garlic:  Preheat oven to 400 degrees.  Remove several layers from the garlic head.  Using a sharp knife, cut off the top, exposing the garlic.  Place in foil.  Drizzle with a little olive oil and season with a little salt and pepper.  Seal tightly with foil and bake 30-35 minutes.  Here is a great blog that explains how to roast garlic.                
i'am author of old country buffet coupons
that give mcdonalds coupons
breakfast coupons you also can find recipe from 
banana nut bread paula deen
almond roca