Saturday, July 16, 2011

Quick Biscuit Style Cinnamon Rolls

These are TO-DIE-FOR!!! Oh my goodness, I can't even explain how delicious these are and how bad I want you all to make them and be in heaven like I was!!  I LOVE cinnamon rolls, but I don't get to make them very often, because they take forever, they make a ton and honestly, I only like cinnamon rolls the day they are made?  I'm kinda a cinnamon roll snob like that.  

These biscuit-type cinnamon rolls are perfect for me, because: 
1.  They don't have eggs, so I can cut the recipe back as much as I want! 
2.  I can make them right when I get a craving, because there is no wait time required!  Or whip together for unexpected company.   
3.  They TASTE GREAT THE NEXT DAY!!  I LOVED THEM! 
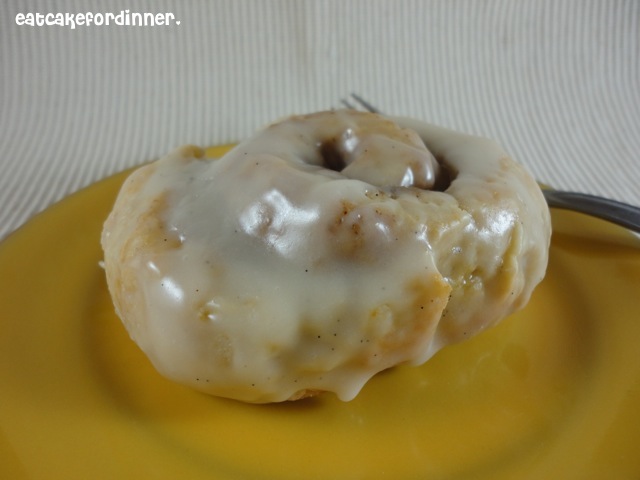
They have the best texture and they are very moist, not dry at all.  To make them even better, I topped them with a vanilla bean glaze - oh my - Is your mouth watering yet?  MAKE THESE RIGHT NOW!  
Quick Biscuit Style Cinnamon Rolls
adapted from: Evil Shenanigans

2 Tbl. packed light brown sugar
2 c. all purpose flour
1 tsp. baking powder
1/2 tsp. baking soda
1/4 tsp. salt
6 Tbl. unsalted butter, divided
1/2 c. sour cream
1/4 c. whole milk 

Filling:
1/2 c. packed light brown sugar
1 tsp. cinnamon
4 Tbl. butter, melted

Vanilla Glaze:
1 oz. cream cheese, softened
2 Tbl. unsalted butter, softened
1/2 tsp. vanilla (I used vanilla bean paste)
1 c. powdered sugar
milk, if needed

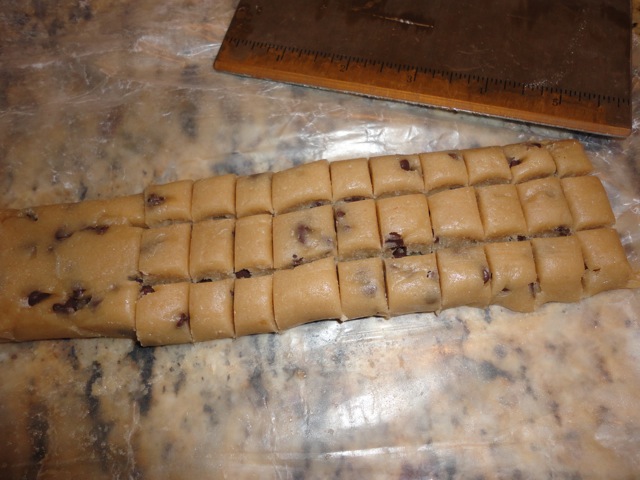
Preheat oven to 350 degrees.  Spray a 9x13-inch cake pan with cooking spray.  Whisk together the brown sugar, flour, baking powder, baking soda and salt.  Dice 2 Tbl. of the butter and rub into flour mixture until it resembles coarse sand (I used my pastry cutter).  Melt remaining 4 Tbl. butter and combine with sour cream and milk.  Pour into dry ingredients and stir until just combined (I had to add a little more milk, because my mixture was too dry).  Lightly flour work surface.  Roll out dough to 1/4'' - 1/2'' thickness.  Combine filling ingredients to form a paste and spread over dough.  Roll up tightly and slice into 1'' - 1 1/2'' slices.  Place into greased pan.  Leave a little room between them to allow to expand while cooking.  Bake 20-25 minutes (mine took 24 min.) or until golden brown and puffed.  Cool 5 minutes.  Combine all glaze ingredients until smooth and spread over warm rolls.  Now, take a bite of one and jump up and down with joy because they are soooo good!!  People will think you slaved all day!  Yield: around 8 rolls (I cut recipe in half and got 4 rolls).    

Thursday, July 14, 2011

Microwave Lemon Curd or Lemon Pie Bars

I seriously could eat this lemon curd by the spoonful.  I found a microwaveable recipe over at Real Mom Kitchen.  It was so easy and so good.  I will be making this again without a doubt.  The first night it was PERFECT, not too tart, just right.  The 2nd night, after sitting in the refrigerator, it was a little more sour than the first night and it might make you pucker a little, but oh I loved it!

I used my lemon curd for some LEMON PIE BARS.  I found this idea in a new cookbook I just got the other day.  The picture looked so yummy.  They use a sugar cookie crust and top it with lemon curd and whipped topping.  Honestly, the bars didn't turn out as good as I had hoped.  I overbaked my sugar cookie crust, so it was a little dry and it turned out thicker than I had wanted, but oh well, that hasn't stopped me from eating them. 

Microwave Lemon Curd
1 c. granulated sugar
3 eggs
1 c. fresh lemon juice
zest of 2 lemons, finely grated
1/2 c. unsalted butter, melted

In a very large microwave-safe bowl, whisk together the sugar and eggs until very smooth.  Stir in the lemon juice, lemon zest and melted butter.  Cook in the microwave for one minute intervals, stirring after each minute until the mixture is thick enough to coat the back of a spoon, about 4 minutes total.  Remove from the microwave and place a piece of plastic wrap directly on the surface.  Cool for one hour.  Store for up to three weeks in the refrigerator in a sealed container.  It will thicken a little more once it has been refrigerated.  Yield: around 2 cups.      
adapted from: Real Mom Kitchen originally from All Recipes    

Whipped Topping
3 oz. cream cheese, softened
1 (6oz.) container French Vanilla fat-free yogurt
3/4 c. marshmallow cream
1 tsp. vanilla extract
1 c. Cool Whip, thawed

Cream together the cream cheese, yogurt, marshmallow cream and vanilla.  Fold in the Cool Whip.  Refrigerate until ready to use.  

Jenn's Notes:  I cut the lemon curd recipe in half.  I used 3 1/2 lemons to get exactly 1/2 cup of lemon juice.  I had to stop and stir my mixture every 30 seconds, because it was getting so hot that it was overflowing my microwave-safe bowl.  So, make sure to use a very large bowl or you will have to stir it every 30-45 seconds.  For the bars, I used a homemade sugar cookie crust (you could always use store-bought if you chose to make the bars) The whipped topping is delicious.  I think if you folded the whipped topping into the lemon curd it would make an AMAZING dessert.  It would be great layered in a trifle.  If you love Lemon desserts, then I know you will LOVE this lemon curd!!!  

Tuesday, July 12, 2011

Baked Ham and Cheese Croissants

It is so HOT outside and sometimes all you want is a nice quick and easy sandwich for dinner.  I am always looking for new quick and easy sandwich recipes.  This baked ham and cheese croissant was delicious.  I was pretty skeptical at first, baking an already baked croissant?  Weird.  I tried it anyway and lets just say that it was even more flaky than it usually is (if that's possible - yes it is)!!  You get a nice crisp crust when you first bite into it.  Then, light and incredibly flaky layers followed by the creaminess from the cream cheese and then the delicious ham flavor.  Oh it was pretty darn good.

Baked Ham and Cheese Croissants
adapted from: Real Mom Kitchen    

4 oz. cream cheese, softened
1/2 Tbl. honey dijon mustard, opt. 
6 large croissants
Monterey or Colby Jack cheese, sliced
3/4 Lb. sliced deli ham

Combine the cream cheese and honey dijon mustard.  Slice the croissants in half, horizontally.  Spread top half with some of the cream cheese mixture.  Layer the ham over the bottom half of each croissant and top with a slice or two of cheese.  Cover sandwich with top layer and place on a baking sheet.  Bake at 350 degrees for about 10 minutes or until slightly golden and crispy and cheese is melted.  Serve immediately. 

Jenn's Notes:  I did not add the honey dijon mustard, because I didn't have any.  I also used Cheddar cheese instead of the Monterey and Colby.  I loved it with the cream cheese and I wished I would have added a little extra.  I served with some corn on the cob and it was delicious.

Friday, July 8, 2011

Neapolitan Whoopie Pies

Remember my Neapolitan Cake that I LOVED?  Well these cookies are a much smaller and faster take on that cake.  I saw this idea over at this blog and I thought, what a genius idea.  I made a 1/2 batch of these whoopie pies and an amazing vanilla bean icing.  I divided the vanilla icing in half and adding some strawberry extract and red food coloring to one bowl and left the other bowl plain vanilla.  That's it - There you have it - Neapolitan Whoopie Pies!  The chocolate cookie is very chocolatey, so I think these need a lot of filling to be able to compete with the cookie.  These whoopie pies are very very yummy!      
Chocolate Cake Cookies
Cookie adapted from: Dessert First

1 1 /2 c. + 2 Tbl. all-purpose flour
3/4 c. +2 Tbl. unsweetened cocoa powder
1/2 Tbl. baking soda
1/2 tsp. baking powder
3/4 tsp. salt
1 stick unsalted butter, room temperature
1/2 c. packed light brown sugar
1/4 c. + 2 Tbl. sugar
1 egg, room temperature
1/2 c. milk chocolate, melted and cooled 
1 tsp. pure vanilla extract 
1 c. buttermilk, room temperature

Preheat oven to 400 degrees.  Line 2 baking sheets with parchment paper or spray with cooking spray.  Sift the flour, cocoa, baking soda, baking powder and salt together.  With an electric mixer on medium-high speed, cream the butter and sugars until light and fluffy, 4 minutes.  Add your egg and mix until combined.  Mix in the chocolate and vanilla, making sure to combine really well.  Turn the mixer to low and slowly add the dry ingredients, alternating with the buttermilk, in 3 batches, starting and ending with the flour mixture.  Make sure to let it mix thoroughly.

Heap the batter onto the baking sheets with a 1-ounce ice cream scoop.  Bake until the tops crack, 12-15 minutes or so (mine are perfect at 12 min).  Cool on a rack.  Repeat with remaining batter. Yield: 30 cookies - 15 pies.  

Vanilla Bean Buttercream
2 1/2 sticks unsalted butter, softened
1 vanilla bean or 1 Tbl. vanilla extract 
2 1/2 c. powdered sugar
pinch of salt
1 tsp. vanilla extract
2 Tbl. heavy whipping cream

Strawberry Frosting
1/2 of the above vanilla bean frosting
1 - 1 1/2 tsp. strawberry extract
red food coloring

In your mixer fitted with a whisk attachment, beat the butter for 20 seconds.  Add the vanilla bean seeds (I use vanilla bean paste) and beat for 15 seconds.  Add the powdered sugar and salt and beat on medium-low for one minute.  Scrape bowl.  Increase speed to medium and beat until fully incorporated, about 30 seconds.  Scrape bowl.  Add the 1 tsp. vanilla extract and whipping cream and beat for 20 seconds on medium.  Increase speed to medium-high and beat until light and fluffy, about 4 minutes.  Yield: 3 cups.  Divide frosting into two bowls.  Add strawberry extract and a few drops of red food coloring to one of the bowls and leave the other bowl plain vanilla.       

To Assemble Pies:  Spread some vanilla icing on the flat side of one cookie, then spread some strawberry icing over the vanilla icing.  Top with the flat side of another cookie.  Repeat with remaining pies.  Or another great way to fill the cookies would be to add both the vanilla icing and the strawberry icing to a piping bag and pipe onto the flat side of one cookie.  This will give you a pretty pink and white swirl of both of the fillings combined.   If you would like a more "natural strawberry" tasting frosting recipe, try my favorite recipe that I used on my Neapolitan Cake, just minus the shortening and scale the recipe back or you will have tonz!    (Printable Recipes)    

Wednesday, July 6, 2011

Mexican Green Rice

I LOVE Mexican Food and I LOVE rice!  So, Mexican Rice is even better!  This rice turned out delicious!!  It has those Mexican flavors that I love, but it was not too spicy.  I think kids could even eat this one?  I served this with one of my favorite tacos (I will post recipe soon)!  I think this rice would be so good in a taco salad or in a copy-cat Cafe Rio salad!      
Mexican Green Rice
adapted from: The Naptime Chef

3 c. low-sodium chicken broth
2-3 poblano peppers, seeded and deveined, roughly chopped
cilantro, to taste
1 tsp. kosher salt
2 Tbl. olive oil
2 c. white rice
1 small onion, finely chopped
2 garlic cloves, minced

Bring chicken broth, poblanos and salt to a boil.  Simmer 10-12 minutes or until chiles are soft.  Pour mixture into a blender.  Let cool a few minutes, then add cilantro and liquify.  If you do not want any chunks, pour blended liquid through a strainer before adding to the rice.  Heat the olive oil in a large pan.  Add the onion and saute until soft.  Add the garlic and cook for 30 more seconds.  Add the rice and stir well.  Last, add the blended chile liquid.  Simmer on medium-low, covered, stirring occasionally, for about 20 minutes or until rice is cooked completely.  If all the liquid is absorbed and the rice is not quite tender, just add a little water and cook for another few minutes.  Fluff with a fork before serving.  

Jenn's Notes:  I made a half of a batch of this rice and I used one very large poblano and a handful of cilantro.  I had to add extra liquid towards the end, because my rice was still a little crunchy and all the liquid had been absorbed.  Half of a batch still made tonz!  Way more than two people could eat.  Next time, I will try 1/4 of a batch or plan another meal for the extra rice!!  I really really liked this rice!   

Monday, July 4, 2011

Homemade Chocolate Chip COOKIE DOUGH Ice Cream

EGGLESS COOKIE DOUGH!!!  One of the greatest creations EVER!  I found this recipe over at Fake it Frugal and was immediately intrigued.  Could I really eat as much cookie dough as I wanted without having to worry about consuming raw eggs!  Yes, this eggless cookie dough tastes exactly like regular cookie dough!  Genius.  


If you have ever purchased a carton of cookie dough ice cream, then you have probably come across opening the carton only to discover that someone has already eaten all of the cookie dough out it and you are left with a carton of plain vanilla ice cream.  Well, you never have to worry about that again. Just whip up a batch of this eggless cookie dough and problem solved!!!  The possibilities are endless . . . . . add some to homemade vanilla ice cream, chocolate fudge ice cream or mint ice cream?  Or switch up the cookie dough, instead of adding chocolate chips, add mini m&m's, toffee chips, Oreo's or chopped up candy bar!  Yummy!
Make your batch of cookie dough.  Roll up tightly in some parchment or wax paper and refrigerate until firm, about 30 minutes - 1 hour
When firm, unroll and cut into squares (whatever size you want your chunks to be)
Add to your ice cream and enjoy every last bite!

Eggless Chocolate Chip Cookie Dough
adapted from: Fake It Frugal

4 Tbl. melted butter
1/2 tsp. salt
1/2 tsp. vanilla extract
6 Tbl. sugar
6 Tbl. light brown sugar
1 c. + 2 Tbl. all-purpose flour
1/4 c. water
1/2 c. mini chocolate chips

Combine melted butter, salt, vanilla, sugar and brown sugar.  Add the flour and water and stir to combine.  Add the chocolate chips and stir well.  

Ice Cream
1.5 quart vanilla ice cream, slightly softened
1/3 c. light brown sugar


Add light brown sugar to slightly softened vanilla ice cream (this will make it taste rich).  Add the cookie dough chunks and place in an air-tight container and freeze.  You do not want the ice cream to get too soft or it won't re-freeze well.  
  
Jenn's Notes:  I used a wooden spoon to stir together all of the cookie dough ingredients, no need to dirty your mixer and beaters.  The dough is pretty sticky and that is why I refrigerated it until it was firm.  You can use it right away, it will just be a little messier.  I added my cookie dough to homemade vanilla ice cream and it was DIVINE.  I posted a half of a batch of the original recipe and it will still give you TONZ of cookie dough.  You could always cut the recipe back some more or just keep the extra in the fridge or freezer to snack on!!    

Friday, July 1, 2011

Chocolate Cupcakes with Peanut Butter Mousse

If a double decker version isn't your thing, try a regular one!
The name of these cupcakes says it all!   Chocolate Cupcakes - Delicious and Peanut Butter Mousse - Divine!  If you are a peanut butter and chocolate fan you will go nuts over these cupcakes.   The cupcake is great, but the mousse is really the star!  It is so incredibly light thanks to the whipped cream and it has just the perfect amount of peanut butter flavor.  I think this mousse would be AMAZING layered in a trifle dish!

Chocolate Cupcakes with PB Mousse
adapted from: Stephanie's Kitchen

Peanut Butter Mousse
3 oz. cream cheese, softened
1 c. powdered sugar
1/4 c. milk
3/4 c. creamy peanut butter
2 c. heavy whipping cream
1 Tbl. vanilla extract

Using a mixer, whip the heavy cream and vanilla until stiff peaks form.  Put in the refrigerator.  In a separate bowl, cream together the cream cheese, powdered sugar, milk and peanut butter.  Stir in about 1/3 of the whipped cream to lighten up the mixture.  Then, carefully fold in the remaining whipped cream.  It may take a minute or so until it is combined and no white streaks remain.  Refrigerate until very very cold (several hours).  

Chocolate Cupcakes
2 1/4 c. cake flour
1 tsp. baking soda
1/2 tsp. baking powder
1 tsp. salt
1/2 c. cocoa powder
1 1/2 c. sugar
2 large eggs
1 tsp. vanilla extract
3/4 c. vegetable oil
1 c. cold water
1/2 c. sour cream
1 c. chopped peanut butter cups, for garnish 

Preheat oven to 375 degrees.  Sift together the flour, baking soda, baking powder, salt, cocoa and sugar; set aside.  Cream together the eggs, vanilla, oil, water and sour cream.  Slowly add the dry ingredients and mix until well combined.  Scoop evenly between 24 lined muffin cups and bake 18-20 minutes or until toothpick comes out clean.  Cool slightly, remove from pans and set on cooling rack to cool completely.  Yield: 24 cupcakes.    


To assemble double layered cupcakes:  Remove wrappers from cupcakes.  Cut cupcakes in half horizontally.  Pipe mousse onto the bottom cupcake half.  Place the top half of the cupcake over the mousse.  Pipe more mousse on the top of the cupcake.  Top with chopped peanut butter cups.  Serve immediately or keep in the refrigerator.      


Jenn's Notes:  I cut the cupcake recipe in 1/4 and had enough batter for exactly six cupcakes.  I baked mine for 18 minutes and they were perfect.  I made half of the mousse and had tonz leftover.  If you end up doing single layer cupcakes, I would definitely cut the mousse in half or you will have way too much.  Immediately after the cupcakes cooled, I tried to pipe on the peanut butter mousse.  It was way too soft and got a little messy.  So, if you are going to make a double layer cupcake make sure to refrigerate the mousse for several hours or overnight if possible.  I don't think the double layered cupcakes would transport very well.  The mousse firms up when refrigerated, but it softens pretty quickly once removed from the fridge and it makes the top cake layer a little unstable.  They sure are yummy!!!      
i'am author of old country buffet coupons
that give mcdonalds coupons
breakfast coupons you also can find recipe from 
banana nut bread paula deen
almond roca